Friday, February 29, 2008

Salvage Fabric: A Biography

OK, so it's 1995, and I just learned to quilt last year, and I'm a graduate student living in the university ghetto of Lawrence, Kansas. Most of the other students have just left town for the summer, and my girlfriend and I know that there will be rich pickings in the dumpsters that line the alley behind my house. And we're right -- in a few hours of mildly unseemly scavaging, we're going to score several pieces of furniture, some wearable clothing, office supplies, a couple of CDs, and other miscellaneous low-budget treasures that light-travelling students have shed rather than haul with them to the next adventure.

In my take is a dress that someone, or someone's mom, has made by hand. It's nothing that my girlfriend would wear, but I've learned to know quilting-weight fabric when I see it, and I'm thrilled to have something new for my little stash. I disassemble the dress into its component pieces, and wonder what uses I might find in the future for my big score...


1997: Bits of the fabric find their way into the pieced border of my first full-sized quilt.


1998: I use the fabric in a very scrappy "Around the World." The piece ends up winning a blue ribbon at the county fair when a error in the published rules creates a category that only it fits into. I feel famous!


1999: A single square of the fabric shows up in a little wall hanging, the last piece I make in Kansas.


2005: Several pieces of the fabric find their way into the big Log Cabin.


2007: Squares of the fabric show up in a child's blanket.


I sometimes wonder if the woman who used to wear that dress still remembers it at all. I've still got plenty of fabric from it left. I'm sure I will find at least a few more uses for it before it runs out....

Tuesday, February 26, 2008

The 2007-2008 Quilting Year Halftime Report


[If you happen to be related to me, you probably shouldn't read this post until after May, 2008.]


This Saturday and Sunday just past was probably the last big quilting weekend of the 2007-08 Season. Longtime readers will recall that the Quilt Year, in my world, begins with the first Oregon Ducks football game in September. Since I generally listen to at least two college football games every weekend throughout the season, the autumn months are when I make the most dramatic progress. Things typically slow down in December due to Christmas preparations, pick up again for January and February, then start to lose steam about, well, now.

There are lots of reasons for the slowdown, but the biggest is that spring in Oregon starts around Valentines Day. Outdoor recreation, work on the house, travel, and the garden all start to make their demands on the weekends, and within a month or two they'll want my time after work as well.

That doesn't mean that I'll stop dead in my tracks, though. I used to not touch quilting at all from Mayish to August, but I those days are pretty much gone. Still, progress is likely to be a lot slower, more putter-ish, and with no whole weekends given over to a particular quilt project.

So, as we enter the slack half of the year, it seems like a good time to look back at the goals I set at the beginning of the season and see how I did. Here goes.

FIRST PRIORITY

The three quilts I was most bound and determined to finish this year were Ice & Fire, Labyrinth, and the high school graduation quilt for Niece #1. The first two are safely and completely finished; I've submitted them both for my guild's annual show, where I'm confident they'll be accepted, and submitted Labyrinth to the Pacific Northwest Quilter's Association biennial show in Seattle, which I'm much less confident about. We'll see!

The graduation quilt was the focus of this last weekend. I finished its quilting, which was only about 1/3 done at the start of the weekend, and made and attached the binding. It still has quite a bit of handwork to be done, as I bury the threads, seal the binding, and attach a sleave, so there will be a few movies in my near future. It should be done in time for me to enter it in the show of a neighboring quilt guild, up in Vancouver, Washington, before I send it up to Alaska. Since I warned the fam off up at the top of the post, and since I doubt my neices spend too much time hanging out on their uncle's quilt blog, I'll give you a quick shot here of the graduation quilt, still with all of its shaggy threads hanging out all over.


SECOND & THIRD PRIORITY

There were three quilts that I listed as being my second priority back in August. It turns out I haven't touch any of them since. I guess I had a change of priorities.

There were four quilts I called my third priority, and I made good progress on three of them. What I'm now calling "Devil's Claw," although that name is in flux, went from being a vague wish to do something with the old blocks I'd found to being a complete quilt face. I also completed faces for the last two of a set of Four Seasons that I've been puttering with for ages. These two projects continue to capture my imagination, and will likely be ones that I make some progress with over the summer. It would be nice to put "Devil's Claw," in particular, in some fall shows.

The other third priority quilt was Two Complex Shapes, which I completely requilted to good effect. I trotted it out for show and tell and the guild earlier this month, where it had an interesting love-it-or-hate-it effect. I got a few compliments, but as I was showing it a few people were only a few notches short of heckling (I followed it with Labyrinth, though, which shut them up pretty effectively). I'll put it in a few smaller shows later in the year, I think.


WHAT NEXT?

Well, finishing work on the graduation quilt is the main thing. Tinkering with Devil's Claw and Four Seasons will probably occupy a few summer hours. A couple items from my Second Priority list -- a scrap utility quilt and something called Batik Squares -- will probably finally get some attention. And then there is the plan I keep refering to with the code named "QuiltStorm 2008," a project to make a large number of simple lap quilts from scrap and recycled materials. That should be fun.

The summer months are also a good time to do non-quilt sewing, the little garment work I do and the baby's blocks I like to make. There's some mending piled up. And... I am almost afraid to mention it... there has been some design work for a Labyrinth #2. Maybe I'll explore that in the coming months, or maybe not. We'll see.

Lastly, some time in August, I'll do the very last thing I need to do every quilt year. That, of course, is to draw up a list of goals for the coming quilt year.


JUST CURIOUS

Do you do more quilting in the colder and darker half of the year? Are you happy with your progress over the winter?

Wednesday, February 20, 2008

How to Make a Quick Crib Quilt, Part III

Interestingly, I have taken longer to write about making the quick crib quilt than I took actually making the quick crib quilt. This suggests an easy rule you can follow to speed up your quilting exploits: Don't blog about them. But what fun is that?

Also: when I started writing this thing, I thought it would all fit into one longish post. It has turned into three bloated posts. So, although I still maintain that basic quilting is, at its heart, actually pretty easy, there is clearly a little more basic knowledge involved than I had quite realized. Interesting.

Anyway.

We left off last time with the three elements of your quilt -- the front, batting, and back -- all securely fastened together with safety pins. [I should confess to you, incidentally, that it took me a full decade to realize that you want to use safety pins, not straight pins, for this. Not only do they stay in place much better, but they are, as the name implies, safe. They do not rip through your flesh throughout the quilting process. Why did it take me ten years to figure this out? Because I'm an idiot, that's why. But enough about me.]


Step Twelve

Quilt That Sucker (Time: variable)

There are many long books out there about quilting, which is the stitching that holds together your three layers so that you can take those safety pins out. I will restrict myself to a few brief notes here.

In theory, unless you happen to have a long-arm quilting machine lying around the house, you could either machine quilt or hand quilt this thing. Hand quilting is like they do it in the movies, where you use a little hoop and actually put all of those little stitches in by hand, with a needle. Yeah, I know, it sounds nuts, but it is actually a marvelous art form and I have a lot of respect for its practitioners. But it is manifestly not what you would call "quick," so we're not going to use it for this quick piece.

In essence, machine quilting is just running the three layers through your sewing machine for a while to attach them together. Preferably, you want to have the pattern of your quilting be something that will enhance the design you created with your pieceing. In this sample, I quilted along several of the pieceing seams, or "ditches," putting a line of stitches about an eighth of an inch to both sides of them. On the border, I ran three vaguely parallel meandering lines in white thread against the star pattern of the border. This pattern softens the dark fabric a little, breaks up the strict geometry of the piece, and in my mind, has a nice Milky-Way look against the night sky.

General Quilting wisdom:


  • Pick thread that are going to go well with your top and your backing. Top thread goes through the needle, backing thread in the bobbin, and they don't have to be the same unless you want them to be.

  • As with fabric, there is a lot of old, surplus, and extremely cheap thread out there in the world, and frequent readers will not be surprised to learn that I have found uses for such stuff. However, machine quilting is not the place to skimp on thread. This is where the structural strength of your piece comes from, so even for a utility piece like this you will want to use at least a mid-range thread no more than a decade old.

  • The greater the density of your quilting pattern -- the "tighter" your quilting pattern is -- the more durable your piece is likely to be. However, if you get carried away and start putting more than around a line of quilting per inch, your blanket is going to start to get scratchy and stiff.

  • The "looser" your quilting pattern, the more important the quality of your thread becomes.


  • Since you are quilting for speed, have your quilting pattern be either one long continuous line, or lines that go from one edge of the piece to another. Quilting lines that start and stop in the middle of the piece are a pain.

  • For quilting in straight lines, as I did in the pieced portion of this quilt, a walking foot is the schizzle. Best $25 I ever spent on quilting gear.

  • If you are actually using this guide, and are curious about "free motion" quilting, just put it out of your mind for now. Come up with a quilting pattern that uses straight lines, and work at getting all of the quilting stitches nice and even and exactly where you want them to be. We'll worry about free motion some other day, perhaps once I get to be any good at it myself.

  • There are many, many ways to mark the surface of a quilt to get the pattern on it before you sew. They all have their pros and cons, but they all time time. For a little crib quilt like this, though, I recommend just eyeballing it (unless you have a marking method that you want to experiment with, in which case it would be a perfect way to practice!).
Step Thirteen

Attaching the Binding (time: maybe 45 minutes)

There are a million ways of doing this. We'll do mine, naturally.

The binding is the piece of fabric that protects the edges of the quilt. Once again, you need to pick a fabric that, at about a 3/4" thickness, will make the rest of your quilt look good. It should also be a reasonably strong fabric, as it will get a lot of wear, and shouldn't be a fabric that you know bleeds dye, as it may get sucked on. In this case, I chose to use the border fabric for the binding as well, but that is by no means necessary or even the norm.

Cut a strip of your binding fabric at 3" width for each of the four sides of your piece; make them at least 6" longer than the length of each side, and preferably a foot or so longer. Fire that steam iron up to it's highest steam-producing level for maximum effect, and press each strip in half all along its length, bad side together. You end up with 1 1/2" strips of doubled fabric, with the good side visible on both sides.

Pin these strips to the quilt. The two cut edges should be lined up exactly with the raw edge of the pieced top. Center your strips before pinning so that the excess length hangs off evenly from each corner.

Then, sew the strips to the rest of the quilt with the usual 1/4" seam allowance. Start and end each strip 1/4" from the edge of the quilt face. (This will work out so that each strip's first stitch begins where its neighbor's last stitch ended. If you accidentally leave a gap there, it's worth going back and fixing it.


Step Fourteen

Mitering the Corners (time: 5 minutes)

People make a big deal about this, but it's easy peasy. At each corner, fold the face of the quilt together so that the two edges are against each other. Where the excess of the binding strips are hanging off, pin them together.

Starting directly across the strip from where the seams attaching the binding strips end, sew the two strips together. Go halfway across the strip at an angle of 45 degrees away from the quilt.


Then, take a right angle turn, and sew back toward the quilt,


ending up at the point where both binding strips meet at the corner of the quilt.

You should end up with a little arrow pointing down the strips, away from the quilt. I usually then turn around and go over the seam a second time, for strength.


Then, poke the arrow inside out with a seam ripper, et viola!!!


Step Fifteen

Tacking Down the Binding (time: a couple hours)

Get a good, mid-length movie. Some quilters prefer NetFlix or Blockbuster for this, but I generally check them out from the library. I am usually a fan of international movies, but it is important to get a movie in a language that you understand, as you won't be able to catch every subtitle. A dialogue-driven drama is best, since you won't have to focus on the screen so much.

Start the movie. As you watch, pick a spot along the binding, and, using a needle and thread, make a stitch that nips a few threads into the "nose" of the binding, and a few threads on the back of the quilt just inside of the seam that attached the binding strip to the front. Make a knot in the thread, sealing the binding down to the quilt back, and then make a few supporting stitches on either side of the knot.

Now, you are ready to tack in earnest. Insert your needle under the quilt back at the knot, run it about 1/4" within the quilt, along the binding seem. Holding the edge of the binding in place, push the needle back up through the back so that it nips into the binding again. Pull the thread through, then dive the needle back into the backing where it just came out, advance another 1/4", and repeat ad nauseum. When you get to the end of your length of thread, make a little knot like you did at the beginning. You will probably need to go through 3 or 4 threads to get through a crib quilt.

I always thought this was a "whipstitch," but I see I was dead wrong. Whatever. Sorry I'm not doing a better job of explaining it.

Make your stitches shorter than 1/4" inch close to the corners, as they will get a lot of stress there. Make sure there is a stitch right next to the seam at both sides of the miter. Also, this is another place where you don't want to be using cheapo thread.

Instead of movies, some people prefer doing this step while at family events, on flights, or at staff meetings if your office is sufficiently relaxed. Whatever.


Step Sixteen

The Warm Glow of Completion (5 minutes)

It's a lovely feeling, but it is usually quickly replaced by a restless enthusiasm for the next project. Congratulations! You've got the bug!


Thanks for reading this rambling primer. Doubtless all of this has been explained better by others, elsewhere. If you know of any good sites, you might want to post them in the comments for the benefit of any newbs who are trying to follow my rambling directions and getting lost.

Thursday, February 14, 2008

How to Make a Quick Crib Quilt, Part II

OK, let's get back to the crib quilt.

So far, we've got it to the point where the design is finished, but we still have some work to do to get it to the point where it's a serviceable blanket.

Step Eight:

Add a Border. (Time: Maybe 20 minutes)

Borders aren't strictly necessary, and I often don't use them on my serious projects. Oftentimes, though, they frame and highlight your design to good effect. For a utility quilt, there's the added bonus that they add quite a bit of area to your piece with a minimum of effort.

You want to pick a fabric that is going to look good with your design, of course. Darks are usually, although not always, better than lights. Look for pieces that echo some of your design's more common colors; or, if your design is primarily in a single color but with traces of a second color, experiment with a boarder in that second color.

Audition border fabric by just setting it next to your finished design. If you are buying fabric for a border, take your finished design to the shop so you can be sure of getting a good match.

I hit the jackpot on this sample quilt, finding an old piece of discount fabric in my collection that was almost exactly the right size to work for both the border and binding (see below). It is a very dark blue, which works to frame and accent the checkerboard pattern of the main design. Although it makes the piece darker than usual for a baby quilt, the fact that it shows stars in a night sky make it appropriate for a night-night. The stars also echo other stars scattered through the main design, and really set off a crescent moon in the upper right.

I cut the border fabric to strips of uniform width (although you can use different widths for the top/bottom and left/right strips, too). In this case, I made the border strips the same width as the blocks in the main design, to keep a harmonious visual look. I cut two of the strips to the design's height, and sewed them onto the design's left and right. Then, I cut the top and bottom strips to the quilt's new width, and sewed those on as well.

The top is finished!


Step Nine:

Backing (Time: 5 - 30 minutes)

It's possible to have a pieced design on both sides of a quilt, but most commonly you just put a single piece of fabric on the back. I like to use flannel for blanket backs, as it is a very warm and gentle fabric, and feels good against the skin, but regular cottons are fine too.

As with border fabrics, you'll want to pick something that looks fairly reasonable with your quilt top, and if you are spending money, it's a good idea to audition your backing before you buy.

For the current project, I once more go with materials at hand and choose an old fitted flannel sheet that I found somewhere. Its jaunty stripiness is an antidote to the darkness of the border fabric, and the fact that it is a used fabric, although is will likely decrease the lifespan of my finished product, will also make it soft and cozy right out of the box.

Cut the backing so that the quilt top can sit on top of it with at least an inch or two of margin on all four sides.


Step Ten:

Batting (Time: 5 - 20 minutes)

The easiest thing is to run out and buy yourself some crib quilt batting.

Once you've quilted for a while, though, you'll notice that you end up with a lot of long, thin strips of batting scraps left over from your larger projects. To save cash and resources, I'll occasionally assemble these scraps into a piece of batting large enough to work for a crib quilt by simply holding two pieces of batting next to each other and running them through the sewing machine with the needle set on a wide zig-zag. The resulting seam is surprisingly strong, and only really needs to last until you quilt the piece anyway. The only trouble I've ever run into with this was the time I used bright red thread for the zigzag stitch, which was then very visible through the thin, light fabrics on my quilt's face. Oops. Lesson learned: Use white thread for tacking batting.

For this projects, I tacked together two scraps left over when I cut the batting for Labyrinth. Cut your batting to about the same size you cut the quilt back.


Step Eleven:

Laying Out (45 minutes)

What I call "laying out a quilt" is getting the top, batting, and back into position relative to each other, ready to quilt. It's surprising how many different ways there are to do this. I'll just tell you how ~I~ do it.

I lay quilts out on our bedroom floor, which has a nice, tight, low-loft carpet. For bigger pieces, I have to adjust the furniture, but not for a little guy like this one. First, I take the backing piece and spread it out, good side down, on the floor. With some heavy duty pins, I fasten it to the carpet, stretching it just a little bit in t the process so that it is pinned out taut.

Then, I lay the batting on top of the backing, and spend some time smoothing it out so it lies naturally and evenly, with no folds creases. If it is new batting and having a hard time "relaxing," you can hold an iron a few centimeters from it and give it a good blast of steam.

Next, the quilt top goes on top of the pile, good side up. Because you gave the backing and batting a few inches of margin, you should be able to center the top now so there is an inch or more of margin on all four sides. Like you did with the batting, except more so, spend a lot of time smoothing the top out until it sits very evenly on the batting and backing.

Finally, fasten the three layers together with safety pins. What? You don't have safety pins? Maybe I should have mentioned this earlier: you'll need a lot of safety pins. Start in the center and work your way out to the edges, making sure the quilt is keeping its unskewed, rectangular shape.

Warning: the first time you do this, you will probably end up fastening your quilt to your carpet. As you practice, you'll go through a stage where the quilt comes up easily enough, but with an interesting velcro sound as 100 pins pull free of where they were just slightly embedded in the carpet. Eventually, you'll figure out how to put in the safety pins so that your quilt pulls up completely smooth. It's all in the wrist.


Your crib quilt is almost finished! You can even kind of use it at this stage! But you shouldn't.

We'll finish it next time in "How to Make a Quick Crib Quilt, Part III: The Final Chapter"

Friday, February 08, 2008

In Praise of Cheap Fabric


After reading the reactions to Part I of my baby quilt primer, I'm inspired to leap to the defense of cheap fabric. Several commenters were surprised by my use of lower-grade material, and thought I was doing new quilters a disservice not to discourage them from using premium fabric.
Those objections represent the majority opinion in the serious quilting community, and I respect that. But, friends, I am here today to deliver the minority report.

Here goes.

The first objection, from Linda, was that new quilters would be turned off by "the frustrations of working with the cheap crap." This confused me for a while, because for simple straight-stitch pieceing, the cheap crap doesn't really handle any differently than the expensive crap. Does it? But I'm wondering if we might have a definitional problem confusing the issue. Let's talk about three categories of fabric:
  • Premium Fabric. Typically has a nice high threat count from good cotton fiber, tending towards better dyeing and fastness of color, generally sold at specialty quilt shops for $9 to $12 per yard.
  • Discount Fabric. Lower threat count, often somewhat "loose" after a coating of starch is dissolved during the initial washing. Wide range of dye quality. Generally sold at, um, chain craft outlets for, on average, $2 to $3 per yard.
  • Salvage. Stuff that's not 100% cotton. Stuff that used to be sheets or clothing. Stuff that is stretchy or limp or smells like your grandma's house in 1972 when you iron it. Generally found at thrift shops or in boxes at the side of the road that say "free," or cut out of clothes, or handed to you in a garbage bag by a well meaning person who asks "Don't you sew or something?"
Now then. My experience is that Salvage fabric can be, yes, very frustrating to work with. (I must mention in passing, though, that my buddy Sara whupped out her first quilt from, if I recall correctly, upholstery samples, quickly and with gleeful abandon. But she's a can-do sorta girl.) Discount fabric can be harder to deal with than premium if you are working on the bias, or if you are doing applique with small pieces. But for good old cut-out-squares-and-sew-them-back-together pieceing, again, I've never noticed it handling any differently from Premium fabric. I don't think a newbie would either.

Jeanne (whom I can't find a link to, sorry) pointed out that Premium fabric is more durable in the long run, and there's no doubt about it. It's 100% true. Absolutely. But the point is also easily overstated, I think; Discount fabric is not the flimsy tissue it is often made out to be. For my first decade or so of quilting, I used discount fabrics almost exclusively. Many of those pieces are now ten to fifteen years old, and to my knowledge none of them have any serious structural issues. My first blanket-sized quilt has been in practical use on my bed every day for 12 years now, and it's fine. The first child's quilt I made saw constant use by a toddler who grew up, as they do, and is now in junior high, and it's been handed down to little sister now. It has a huge ink stain on it from an unfortunate incident along the way, but the fabric is completely intact. It has lasted longer than it needed to!


In Praise of Premium Fabric

Now the truth is, although I still have acres of Discount fabric in the stash, I almost never buy it anymore. When I buy fabric now, I go the Premium route. There are excellent reasons to buy Premium fabric; here are my Top Four in increasing order of importance.

#4 - The durability is better over longer time spans.

#3 - The color fastness is often, although not always, better.

#2 - When you buy Premium, you support the quilt shops that are the hubs of the community.

#1 - Premium fabrics are, typically, on average, more beautiful. Obviously, that matters. For a serious artistic project, they are the obvious choice if you can afford them.


In Praise of Discount Fabric

But having said that, I really resist the idea of telling a new quilter that Premium is the only way to go. Because it's not that Premium fabric is, like most products, 20% or 50% or 100% more expensive than the Discount equivalent. It's usually 400% to 500% more! That kind of price differential makes using Premium fabric a very, very expensive way to make all of the mistakes you are going to make, and to work through those first naive design ideas you are going to come up with, when you are first starting out.

The thing is, if Discount fabric is off-limits the craft becomes strictly the domain of the well-off. The reason that I only used Discount fabrics for so long, after all, is that they were simply all I could afford, and I have never been anything resembling truly poor. Even at that, and even at the Discount price, my finished tops used to wait sometimes for Christmas gift certificates so I could afford backing fabric for them.

The only reason I can buy Premium fabric now is that I've reached enough of a level of mid-life affluence that I have extra money to throw at my hobby. I buy it because I CAN. If I had played my cards differently, though -- if I had wanted to have children, for instance -- I seriously doubt I could afford the good stuff now. But I would still want to make an occasional quilt.


In Praise of Salvage Fabric

Even though I can afford Premium fabric now, I still don't see the point of making utility quilts from it. For utility quilts (and remember, I consider a working crib quilt to be a utility item) I like to reach back to the practical origins of pieceing. I like the challenge of making do with what is on hand, imitating -- albeit in great comfort and without the desperation of necessity -- the way that earlier quilters made practical use of available scraps during the many centuries when fabric was a precious commodity.

Times have changed, of course. The drunk who once staggered into my mom's quilt class to announce "these are the ladies who cut cloth apart and then sew it back together!" was not the only person to notice that modern decorative quilting has strayed a long way from its practical roots. Well, that's fine. But I get a great deal of satisfaction out of finding use for the Salvage fabric that washes up on my shores. It's kind of a fun game, trying to keep it out of the landfill by doing something useful and attractive with it. That's what the QuiltStorm project (stay tuned!) is going to be all about, and that is why, in the next post, you will see me use an old flannel sheet that I found on the sidewalk as the back for my highly scrappy crib quilt.

And yes, that's a highly SCRAPPY crib quilt. With an "S." It looks great! If I do say so myself! It is by no means archival, but I betcha it will stay in one piece longer than the baby will stay a baby, which is as long as it needs to. It's comfy and cozy and warm! And the total materials cost, fabric, batting, and thread, was: FREE. 100% scrap and salvage.

Tuesday, February 05, 2008

How to Make a Quick Crib Quilt, Part I

Crib quilts are fun to make. It's nice that they are so SMALL -- it makes them easy to handle, and they go fast. Plus, there is no reason to get all fancy about a piece that is going to be repeatedly barfed on and then, later, dragged through mud puddles. You can be more relaxed and experimental with a crib quilt than with something you are making for grown-ups, where you run the risk that people are actually going to be looking at your work for years to come.

If you are an experienced quilter, remember: most parents will be stunned and delighted that you made their child a quilt, but will have no particular sense of its relative quality. And the baby, of course, has no idea what's going on. The crib quilt is therefore an opportunity to showcase, shall we say, your fastest work.

A crib quilt is also a great place to start for a newbie. Are you a newbie? Do you have a sewing machine? Splendid. Let's shred. (If you are an experienced quilter, you can read along if you want to, but really, you already know all of this stuff.)


Step One:

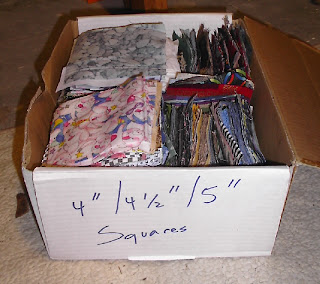
Get a bunch of fabric squares that are all the same size. (Time: Variable)

I cut low-end fabric scraps into 3", 4", 4 1/2", and 5" squares and keep them on hand for exactly this kind of thing. I keep an eye out for juvenile and pictorial scraps at the right scale, and once in a blue moon I'll even buy an eighth of a juvenile fabric just so I'll have some some animals, buildings, vehicles, and other whimsical images on hand for crib quilts and fabric blocks. Kids groove on the images, and they give the quilt some value as a vocabulary-builder when its owner first starts talking.

If you don't have a fabric collection on hand, you'll just have to cut your squares, unless you know me in real life, in which case you can just use some of mine. I've got tons. If you actually go out and BUY fabric for a crib quilt, I encourage you to get the cheapest material you can find. There's no point in shelling out for premium quilting fabric; it's not going to look any fancier than the buck-a-yard sale stuff from JoAnne's after a few dozen barf-and-wash cycles.


Step Two:


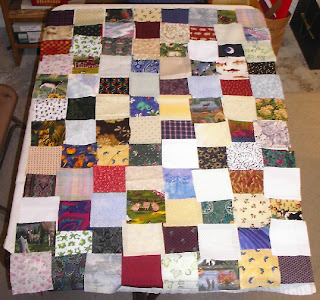
Lay out your squares. (Time: 30 minutes)

This is the fun part. I went for kind of a dark/light checkerboard effect here, but any kind of pattern seems to work fine. I've done crib quilts with jumbled jewel-tone squares and one with no pattern whatsoever, and they ended up fine. Keep moving pieces around until it looks good. It's never a bad idea to go away and do something else for a while, and then come back and see if you still like it.


Step Three:


Keep the squares organized. (Time: 15 minutes)


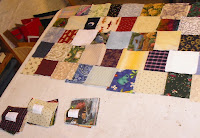
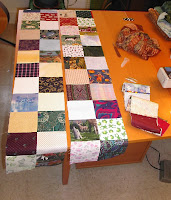
Once you are satisfied with your design, you'll have to have a system to keep your layout intact (unless you are going to sew them together immediately, which would be perfectly acceptable. I'm not the boss of you). Here, I'm keeping each of the eight columns together. I've turned each into a stack, making sure to pay attention to which way is "up" for each piece, and to be consistent about having the top of the quilt be the top of the stack. I pin each stack together, along with a number that is faced right-side up (it's a good idea to underline your 1's, 6's, 8's, and 9's). On stack one, I note that it is the left-hand column.


Step Four:

Sew strips together. (Time: 5 minutes/strip)

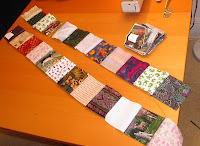
This should go quickly -- it's just attaching each piece to the one above it with a quick, short seam. (For each seam, you put the two "good" sides together and sew a straight stich 1/4" from the edge of the fabric -- the infamous "quarter inch seam allowance.") You'll end up with a bunch of really long, skinny strips of pieces.


Step Five:


Press seams open. (Time: 1 minute/strip)

On the back side of each strip, you need to press each seam open and flat with an iron. But here's where things get controversial. Most quilters will tell you that you then need to "press it back closed," ironing both edges over to one side or another in an alternating pattern from strip to strip. But I don't do that anymore. I press those seams open and leave them open, and find this gets me better results in the long run. I'm definitely in the minority on that score, though.

Some experts say that you should not use a steam iron for quilting. This is because they are silly. Steam not only makes the iron more effective, it also produces a highly satisfying hissing noise and dramatic clouds of vapor, and you wouldn't want to deprive yourself of that.


Step Six:

Pin Strips Together. (Time: Variable)


Now you need to start sewing those strips together. The length of time this takes is going to depend on something that seems a little esoteric at first: how concerned you are with your corners meeting up precisely. This is something that quilters tend to get pretty exercised about. Me, for instance, I don't like my corners to be off by more than two thread widths.

To make that happen, I use special, extra-fine pins to attach the strips together, with at least one pin at every place where seams are going to meet. It takes a while, and is not an especially exciting part of the process. If you are a beginning quilter, you can aim for a lower standard and speed up the process a little. If you decide to "go for a rustic look," or if you just don't give a damn, you wouldn't really have to pin at all. You could just wing it. I've never done that, but it sounds very liberating.

Step Seven:

Continue Pieceing. (Time: About as long as Step Six)

Once you have sewn all of your pairs of strips together, you just take out the pins, press the new seam open (and press it back shut, if you want to), and then pin neighboring pairs together to continue assembling the quilt face. The nice thing about this process is that it accelerates as you go. In this example, for instance, we started with eight strips, so I had to pin four pairs together. After that first round, I only had to pin two pairs of pairs. That second round left two chunks of four columns each, so it was just a matter of pinning those two pieces together, and....


Voila! The main area of the quilt face is finished!


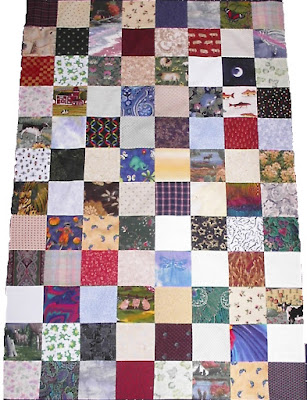
However, it's still very thin, small, and fragile. As it stands, it's not gonna keep a little punk, er, that is, a beautiful precious baby, very warm. We still have some work to do.

So, tune in next time for "How to Make a Quick Crib Quilt, Part II: The Revenge."